
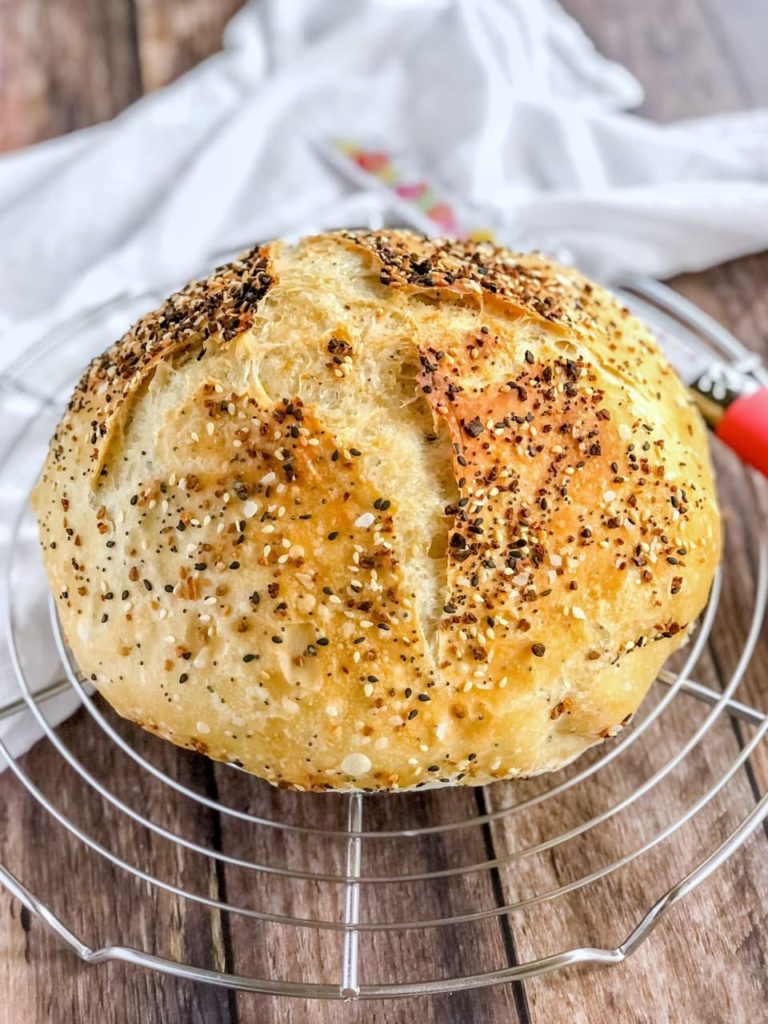
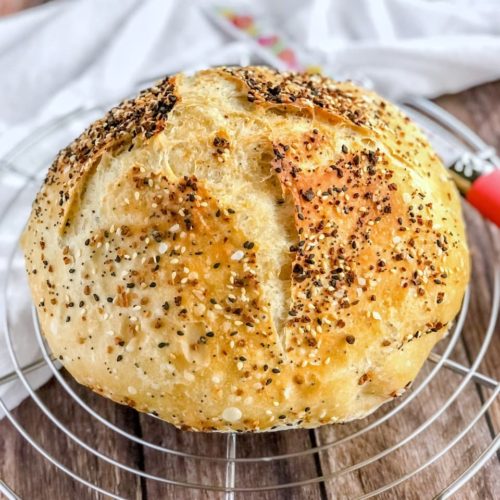
I love how simple no-knead bread is so I’ve been trying some different flavors. This Everything Bagel variety turned out beautifully. No-knead bread is so simple to make. It takes five minutes to throw the dough together and then you just let it sit covered in a draft free spot until you are ready to bake, up to 24 hours. This means you can mix it together in the evening, leave it, and bake it in a Dutch Oven pot the next morning for lunch, or fresh for dinner the next evening. The longer it sits, the more beautiful the flavor!
No-knead bread requires just a few simple ingredients that you probably already have in your pantry. Just flour, salt, yeast and water! Then you can mix in any seasoning you like. I love everything bagels, so it was an easy decision to try it when I saw the seasoning mix in my spice cabinet. It was so good the first time I made it with the seasoning mix stirred in to the bread, but I loved it even more when I added more seasoning mix to the crust as well, just like my favorite everything bagel!
Try this easy recipe and see how wonderful it is to have fresh bread at your table! A good tip for slicing this bread, turn it on it’s side and slice down – the bread will be less crushed that way!
Ingredients:
- 3-1/4 cups bread flour or all purpose flour
- 1 tsp instant yeast
- 1 tsp salt
- 2 Tbsp everything bagel seasoning, divided
- 1-1/2 cups warm water
Instructions:
- In a large mixing bowl, whisk together the flour, yeast, salt and 1 Tbsp of everything bagel seasoning.
- Add the warm water and stir with a large fork until combined. (It will look pretty shaggy.)
- Cover with saran wrap, (I throw a towel over the top too), and let it sit for 12-24 hours in a non-drafty place. (I keep mine in the empty microwave.) The dough will have tiny bubbles all over the top.
When ready to bake:
- Sprinkle some flour on a good sized square of parchment paper.
- Turn your dough out on to the parchment paper, keeping as much of it in the middle as you can.
- Flour up your hands and sprinkle a little over the top of the dough, (if your dough feels loose, sprinkle with a little more flour), then fold the dough into itself while rotating to create a ball. Flip it over so the smooth side is on the top and use your hands to complete shaping in to a ball.
- Cut an X in the top of the loaf with a sharp knife, cover loosely with plastic wrap, and let it rest for 30 minutes.
- Meanwhile, place a Dutch oven pot in the oven with the lid on and preheat the oven to 450 degrees. Let the Dutch oven sit in there and heat for the 30 minutes the bread is resting.
- Dust off any extra flour from the parchment paper around your loaf. Brush or spray your loaf with a little warm water and sprinkle the additional Tbsp of everything bagel seasoning over the top as evenly as possible.
- Carefully remove the Dutch oven from the oven and remove the lid. (Make sure to use your pot holders!)
- Pick up the ball of bread by the edges of the parchment paper and carefully lower the entire thing in the hot Dutch oven.
- Replace the lid, (don’t forget how hot it is), and place the Dutch oven back in the oven.
- Bake for 30 minutes.
- Open the oven, remove the lid and bake an additional 5-10 minutes, or until the loaf is as golden brown as you like it.
- Remove the Dutch oven from the oven and transfer the bread to a cooling rack. (I use the parchment paper to lift it out.)
- Try to let it cool at least 30 minutes before slicing with a serrated bread knife


Everything Bagel No-Knead Bread
EQUIPMENT (Amazon Associate Links)
Ingredients
- 3-1/4 cups bread flour or all purpose flour
- 1 tsp instant yeast
- 1 tsp salt
- 2 Tbsp everything bagel seasoning, divided
- 1-1/2 cups warm water
Instructions
- In a large mixing bowl, whisk together the flour, yeast, salt and 1 Tbsp of everything bagel seasoning.
- Add the warm water and stir with a large fork until combined. (It will look pretty shaggy.)
- Cover with saran wrap, (I throw a towel over the top too), and let it sit for 12-24 hours in a non-drafty place. (I keep mine in the empty microwave.) The dough will have tiny bubbles all over the top.
- When ready to bake: Sprinkle some flour on a good sized square of parchment paper.
- Turn your dough out on to the parchment paper, keeping as much of it in the middle as you can.
- Flour up your hands and sprinkle a little over the top of the dough, (if your dough feels loose, sprinkle with a little more flour), then fold the dough into itself while rotating to create a ball. Flip it over so the smooth side is on the top and use your hands to complete shaping in to a ball.
- Cut an X in the top of the loaf with a sharp knife, cover loosely with plastic wrap, and let it rest for 30 minutes.
- Meanwhile, place a Dutch oven pot in the oven with the lid on and preheat the oven to 450 degrees. Let the Dutch oven sit in there and heat for the 30 minutes the bread is resting.
- Dust off any extra flour from the parchment paper around your loaf. Brush or spray your loaf with a little warm water and sprinkle the additional Tbsp of everything bagel seasoning over the top as evenly as possible.
- Carefully remove the Dutch oven from the oven and remove the lid. (Make sure to use your pot holders!)
- Pick up the ball of bread by the edges of the parchment paper and carefully lower the entire thing in the hot Dutch oven.
- Replace the lid, (don't forget how hot it is), and place the Dutch oven back in the oven.
- Bake for 30 minutes.
- Open the oven, remove the lid and bake an additional 5-10 minutes, or until the loaf is as golden brown as you like it.
- Remove the Dutch oven from the oven and transfer the bread to a cooling rack. (I use the parchment paper to lift it out.)
- Try to let it cool at least 30 minutes before slicing with a serrated bread knife!


I love your recipes. Keep up the good work.
Sherylann
Thank you so much! 🙂
Could you put the recipe in a bread machine?
I’ve never tried this in a bread machine, so I would not know what adjustments you might need to make!
What do I use if I don’t have a Dutch oven?
You could use a covered stainless steel pot – as long as the pot and the lid can withstand temperatures up to 450 degrees. You could also use a springform pan or oven safe casserole dish – again, make sure it can withstand temperatures to at least 450 degrees. 🙂 You can tent any of the pans with foil – just make sure it’s loose enough to let the bread rise up 🙂
I’m trying to print this recipe but it won’t let me. I click print—it goes briefly to the print page, then immediately pops back over to the main recipe page. I’ve tried multiple browsers. May want to have a look on the back end. It’s a great recipe!
Thank you so much for the heads up – let me see what I can find on this! 🙂
Couple questions…
Can you mix this in your kitchenaid and can you cook it in anything else besides a dutch oven? Thanks, looks delicious and I can’t wait to try it!
You only mix enough to bring the ingredients together, you don’t beat it, so you won’t want to use a mixer at all. You can use a deep cooking pot that has a lid as long as it is oven proof to 450 degrees. If you don’t have anything like that you could also try an uncovered cast iron pan, but if you go that route, it will most likely take less time, so I would start checking at 30 minutes. Additionally, if it gets too brown, place foil over the top to let it finish cooking!
I baked in a normal bread pan (not sure if it’ll work but we’ll see) . Should I bake it until a toothpick comes out clean? Or how should I know when it’s done?
I have not cooked this one in a bread pan, I usually do my loaf pan recipes for 30 minutes at 350 for until they register 190 degrees with an electronic thermometer. However, this may be a little too much dough for the loaf pan- let me know how it turned out!
First time ever making any kind of bread! I followed instructions and baked at 22 hours but it was a little gummy in the middle. Any ideas as to what I may have done to cause this?
It smelled fantastic tho
Try baking a little longer, your oven could be a little off temp? – if you have an instant read thermometer, you can check that it is done by reading the temp in the middle – I usually aim for 190F!
Thank you for this recipe! I was curious if its necessary to use instant yeast with such a long rise time? Will active dry yeast work? Thank you 🙂
Absolutely you can use active dry yeast! 🙂
A great hit! I’m not a baker and this turned out perfect!
Thank you so much for rating and commenting! I’m so happy to hear that! It makes my day. 🙂
Hello. Just curious for the all purpose flour. Do you use unbleached flour
I do use unbleached, but either would be fine 🙂
What temperature should water be?
I usually do around 110-115 degrees!
Do you have to use instant yeast or can you also use active dry if that’s all you have available?
You can absolutely use active dry.
I have never made a no knead bread before, have worn out a couple of bread machines! I did have a problem with the dough being very wet and sticky. I had added a little extra water when mixing it up since it wasn’t coming together. Maybe that was the issue? Was really hard to get it to form into a ball, was sticking to the parchment. In the end, I got it to form and got it in the Dutch oven . Just got it out from the oven and it looks lovely and smells wonderful. I cut a wedge of it to make sure it wasn’t doughy. It is delicious! Leave it to me to make a very simple recipe a challenge lol Thx and I will do better next time!
Baking bread is often trial and error! The dough is shaggy and a little drier when you first mix it together but it usually rises perfectly. I’m so glad it turned out!! I’m excited for your new bread adventures!
I give this recipe too ratings 😍
So easy to make and also tastes super delicious!! Thank you so much!! 😍
Ah, thank you so much, these kind of comments truly make my day – thank you for rating too! 🙂
Absolutely adored this bread! 10/10, I will make this again. So easy to follow and so flavorful 🤤
Thank you – I appreciate the comments and ratings so much! They make my day. 🙂
This looks delicious. I’m going to try it. What size dutch oven should I use?
Hi Brenda! I used a 7 qt. 🙂
What size Dutch oven is best for this recipe?
I used a 7qt 🙂
What happens if you do knead the dough and let it rise again?
I haven’t tried that with this recipe – if you want a knead bread recipe, there are a couple on this blog – I recommend the Honey Wheat or the Honey White
This looks beautiful and delicious! I was wondering if you thought it would freeze well if left whole? I’m thinking I want to be ambitious and make one for present day Nicole and one for future Nicole lol
I don’t see why you couldn’t freeze one, but it’s always best fresh – I just throw one in at night the night before, it takes just five minutes, then you can bake it fresh ANY time the next day 🙂
What size Dutch oven is best for this recipe?
Can you use discarded sourdough starter? If so how much and would you still use the same amount of yeast and flour. I’m new to making sourdough bread. Thank you.
Can discarded sourdough e used ? If so, how much and would the. Other ingredients change? I’m new to making sourdough bread. Thank you
You can, but it is a process in which you have to make adjustments to account for water and flour in the starter. You would need to look up how to convert the recipe to a sourdough loaf!
How would I add cheese to this recipe? I’m thinking of sharp cheddar.
I’ve actually been working on a white cheddar jalapeno variety and have found that you can stir 2 cups of cheese in to the dry ingredients before stirring in the water and it has been turning out beautifully!
This bread is the best! Think it would work as a pizza crust?
I’ve never tried it as a pizza crust! Pizza crust is usually made with a higher protein flour (OO) and more water – I would use an actual pizza crust recipe for best results! 🙂
I make a Dutch oven bread exactly the same minus the bagel seasons but I only let it raise for 2-3 hours then bake…why the longer time??
Hi Carole! The longer rise time allows for more complex flavors to develop, which results in a richer and more flavorful bread with even better texture. You can absolutely do less time, the flavors will just not be quite as developed. 🙂
Wow! First time making bread, and it came out PERFECT!!! I love how many times you say to be careful with the hot Dutch oven 😂 I’m someone who would forget. I can’t wait to try your other recipes! 😋 🍞
Ah, this makes my day. I am so glad you liked it! Thank you for the comments and rating. 🙂
I’m currently making this bread but I don’t see when I add the other tablespoon of seasoning! Do I sprinkle it for the 2nd rise or just before it goes in the oven? What did all the commenters do?
Hi Louisa! It’s in direction number 6 on the page, or 9 in the recipe card – sprinkle it right before it goes in the oven. 🙂
I made this for dinner guests. It was a huge hit! It’s so easy and very delicious.
I’m going to make it this week but I’m substituting raisins and cinnamon. I’ll let you know how it turns out.
Keep up the delicious recipes. I’ve made lots of sourdough loaves but this was much less complicated.
Thank you so much for commenting and rating it makes my day! I’m working on a couple different variations and cinnamon sugar raisin is one of them! For sure let me know how yours turns out. 🙂
I made this as a cinnamon raisin loaf and it was delicious! I made the following changes:
1 tablespoon cinnamon
A sprinkle of apple pie spice
1tsp vanilla
2 snack sized boxes of raisins
I omitted the everything bagel seasoning
I baked it in a loaf pan at 400 degrees for 45 minutes.
I’m so happy it worked out! Thank you for sharing! 🙂
I love this recipe and I’ve made it 4 times. I got called away this last time and wasn’t able to be around to put it in the oven. I put it in the fridge for the second rise. Fingers crossed it turns out.
I’m so glad you enjoy this recipe! Thank you for the rating and comment. They make my day! 🙂
Can I substitute some of the bread flour for whole wheat? Maybe 1/2 c of whole wheat and 2 3/4 c bread flour?
Sure that should not be a problem – it will taste a little different, obviously 🙂
This is such a good loaf of bread and the recipe is so easy to follow! My husband loves this bread!!
Thank you! I’m so glad to hear that – it makes my day 🙂
It’s one of my biggest flexes making this loaf.
Ah yay! That makes me so happy! Good for you! 🙂
I started making this bread 7 months ago and found it to be the easiest and most delicious bread I’ve ever made (I’m 70). My husband and I LOVE this recipe to the point that I make it at least 2x per week. Sometimes I omit the everything seasoning to have a plain loaf for peanut butter and honey sandwiches. I bake it in a Dutch oven and it comes out perfect every time. In the summer when there’s high humidity (east TN), I use slightly less water.
Ah thank you so much for commenting and rating, Kathy! I truly appreciate it and I am so happy to hear you love this recipe! 🙂
Quick to put together recipe that results in picture perfect product! I have made this recipe several times and haven’t been disappointed once.
Quick to put together recipe that results in picture perfect product! I have made this recipe several times and haven’t been disappointed once.
I’m so glad to hear that – thank you so much for commenting and rating – it makes my day! 🙂
The second time however, the seeds burnt on the top. Is there a way to ensure this doesn’t happen again? I didn’t spray water, but I did brush lightly .
Thank you!
Bake too long
Amazing recipe but is there information and nutritional facts 🤔
I’m so glad you liked it, thank you for commenting and rating! Since I don’t run ads and make money off this site, (it’s a hobby for me) I haven’t added that feature. (I do pay quite a bit out of pocket for the site and features I have added for you already.) There are sites that you can put the recipe in to that will give you that information for free. 🙂
Love this bread and so does everyone I bake it for. So easy and makes me look like a bread connoisseur lol. Thank you so much. I’ve used this recipe at least 12 times already. ❤️❤️
These kinds of comments make my day. 🙂 Thank you for rating and commenting. 🙂
I have made this before and it turned out beautifully!!! Is it okay if I mix the dough and only let it sit for about 4-5 hours?? I am in a time crunch 🙁
Oh my, this is superb! I didn’t not have instant yeast, so I proofed it in the warm water. I let it raise two hours, shaped it, let it rest for a half hour, then baked. We are gobbling it down 😄
I’m so glad you liked it! Thank you so much for commenting and rating – it always makes my day