

I have wanted to try making cheesecake in my instant pot for months but I didn’t have a small enough spring-form pan until my hubby brought me one home as a surprise this week. I was skeptical on how good of a cheesecake could come out of the pressure cooker, but I was literally blown away by the smooth and creamy perfection. The hardest part of making this cheesecake is waiting for it to set in the refrigerator. Best practice would be to make it the day before the day you want to serve it because it gets better the longer it sits in there.
A couple of notes: It’s super important to have room temperature ingredients. This helps the cheesecake be smooth and creamy and NOT grainy! Also, you don’t want to over mix the cheesecake batter once you are adding in eggs, so beat it as smooth as you can with the other ingredients before mixing them in.
Ingredients:
Crust:
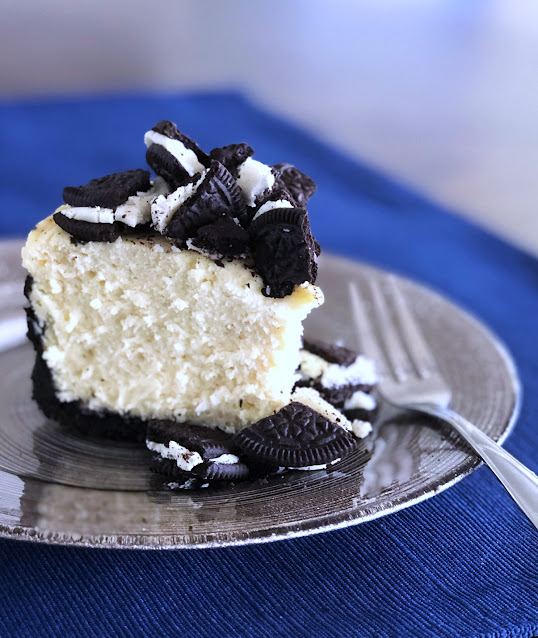
- 1 cup crushed Oreo cookies
- 2 Tbsp butter, melted
Filling:
- 16oz cream cheese, room temp
- 1/2 cup sugar
- 1/4 cup heavy cream
- 1 Tbsp flour
- 1/2 tsp salt
- 1 tsp vanilla
- 2 eggs, room temp
- Additional Oreo’s for topping
Instructions:
- Cut a piece of parchment paper to fit in the base of a 6″ spring-form pan. Place the parchment paper inside the pan and spray the bottom and sides with non-stick spray.
- Place your pan on a large square of foil with a folded paper towel between them. Lift the edges and form to the pan to seal the bottom.
- Make a foil sling to help you lower the cheesecake in to the pot and lift it out. (Rip off about a 2 foot piece of foil and fold it in thirds length-ways.)
- Mix the crushed Oreo’s with the melted butter and press in to the bottom and slightly up the sides of the prepared 6 inch spring-form pan.
- Put the pan in the refrigerator to let the crust firm up while you whip up the filling.
- Whip the cream cheese with a hand mixer until smooth. Scrape down the sides.
- Add the sugar, heavy cream, flour, salt and vanilla and combine. Scrape down the sides.
- Whip in the eggs at low speed one at a time until they are just combined. (At this point you can stir in a few chopped Oreo’s if you like. I prefer making it plain and just adding the Oreo’s to the top instead.)
- Pour the filling in to the crust. Tap the pan lightly on the counter then let it sit ten minutes to get all the air out. Pop any bubbles you see and smooth it over with an offset spatula.
- Cover the cheesecake lightly in foil.
- Pour 1 cup water in to the instant pot insert. Place an instant pot trivet in the bottom, (OR you can use 3-4 canning jar lid rims.)
- Using the foil sling, carefully lower your cheesecake in to the pot and fold the sling inwards so the lid will shut properly.
- Place the lid on the instant pot, lock it and make sure the steam valve is set to sealing. Use manual time to add 35 minutes. Let the cheesecake bake and then let naturally release.
- Once the steam has all released, carefully remove the lid of the instant pot and use the sling to remove the cheesecake and place it on a cooling tray.
- Take off the foil and let it cool until it’s room temperature.
- Once cool, wrap it tightly in saran wrap, (still in the spring-form pan), and refrigerate for a minimum of 4 hours, or preferably overnight.
- When ready to serve, you can carefully run a very thin knife around the edges of the cheesecake if it looks like it won’t release easily, then release the spring-form pan and transfer to a serving platter.
- Garnish with crushed Oreo’s and serve. When slicing the cheesecake, use a large, sharp, hot knife, carefully wiping it in between each cut for the best results.


Instant Pot Oreo Cheesecake
EQUIPMENT (Amazon Associate Links)
Ingredients
Crust:
- 1 cup crushed Oreo cookies
- 2 Tbsp butter, melted
Filling:
- 16 oz cream cheese, room temp
- 1/2 cup sugar
- 1/4 cup heavy cream
- 1 Tbsp flour
- 1/2 tsp salt
- 1 tsp vanilla
- 2 eggs, room temp
- Additional Oreo’s for topping
Instructions
- Cut a piece of parchment paper to fit in the base of a 6″ spring-form pan. Place the parchment paper inside the pan and spray the bottom and sides with non-stick spray.
- Place your pan on a large square of foil with a folded paper towel between them. Lift the edges and form to the pan to seal the bottom.
- Make a foil sling to help you lower the cheesecake in to the pot and lift it out. (Rip off about a 2 foot piece of foil and fold it in thirds length-ways.)
- Mix the crushed Oreo’s with the melted butter and press in to the bottom and slightly up the sides of the prepared 6 inch spring-form pan.
- Put the pan in the refrigerator to let the crust firm up while you whip up the filling.
- Whip the cream cheese with a hand mixer until smooth. Scrape down the sides.
- Add the sugar, heavy cream, flour, salt and vanilla and combine. Scrape down the sides.
- Whip in the eggs at low speed one at a time until they are just combined. (At this point you can stir in a few chopped Oreo’s if you like. I prefer making it plain and just adding the Oreo’s to the top instead.)
- Pour the filling in to the crust. Tap the pan lightly on the counter then let it sit ten minutes to get all the air out. Pop any bubbles you see and smooth it over with an offset spatula.
- Cover the cheesecake lightly in foil.
- Pour 1 cup water in to the instant pot insert. Place an instant pot trivet in the bottom, (OR you can use 3-4 canning jar lid rims.)
- Using the foil sling, carefully lower your cheesecake in to the pot and fold the sling inwards so the lid will shut properly.
- Place the lid on the instant pot, lock it and make sure the steam valve is set to sealing. Use manual time to add 35 minutes. Let the cheesecake bake and then let naturally release.
- Once the steam has all released, carefully remove the lid of the instant pot and use the sling to remove the cheesecake and place it on a cooling tray.
- Take off the foil and let it cool until it’s room temperature.
- Once cool, wrap it tightly in saran wrap, (still in the spring-form pan), and refrigerate for a minimum of 4 hours, or preferably overnight.
- When ready to serve, you can carefully run a very thin knife around the edges of the cheesecake if it looks like it won’t release easily, then release the spring-form pan and transfer to a serving platter.
- Garnish with crushed Oreo’s and serve. When slicing the cheesecake, use a large, sharp, hot knife, carefully wiping it in between each cut for the best results.


0 Comments